
Background
Elastic File Store is one of the storage offerings from Amazon. EFS acts much like an on-premise file server. The beauty of EFS is revealed in part of its name -- elastic.
The file store used by EFS automatically scales based on usage. If your storage needs are reduced, your costs follow as well. Like a traditional on-premise file server, EFS is meant to be accessible from multiple EC2 instances, or from an on-premise location via Direct Connect. This is in contrast to EBS (Elastic Block Store) which is intended as a persistent block store for a single EC2 instance.
From Amazon's FAQ:
What follows is an outline for creating an EFS Server along with a means to access from EC2.
Create EFS
In the Amazon Console, Storage >> EFS.
If this is your first time, click the button.
Select the desired VPC in the Configure file system access section.
In the Create mount targets section, choose the Availability Zones and Subnets desired.
Click .
On this page, you can elect to enter Tags, Performance Mode and Encryption.
Click .
Click .
You should see a success message.
Note the subnets chosen for use in the EC2 instance section below.
Keep this tab open for now.
Create EC2 Instances
In a new tab, spin up two or more EC2 instances using the Amazon Linux AMI. This particular AMI comes with the nfs software pre-installed. Installing the nfs software is included in the Amazon EC mount instructions, so if you're selecting another flavor of Linux, installation will still be straightforward.
On the Configure Instance Details page, choose the appropriate VPC under Network.
Choose one of the subnets that you launched your EFS into from above.
For Auto-assign Public IP, make sure to .
Continue through the subsequent steps of the wizard until you get to the key portion. There elect to create a new key or use an existing one.
Access from EC2
Back on the EFS tab, you should see a link for Amazon EC2 mount instructions. The link will yield something like the following:
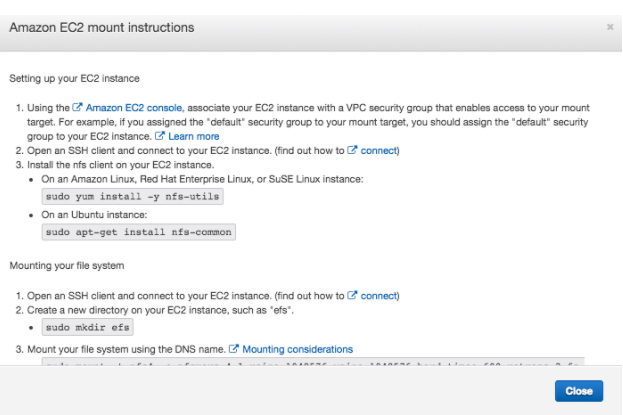
Earlier, I mentioned that you wouldn't need to install nfs on your EC2 instance assuming that you used the Amazon AMI. Note above, however, that the instructions are easily available here.
Back on the EC2 tab, choose one of your instances. Click the button at the top of the page.
Open a terminal for SSH. Locate the .pem file downloaded earlier. (Personally, I find it best to move it from the Downloads directory to another location.)
In the pem file directory, run:
chmod 400 filename
Then ssh into your instance using the command supplied by clicking the button mentioned earlier.
From the EFS instructions:
sudo mkdir efs
sudo mount -t nfs4 ...
Be sure to copy the instructions supplied by Amazon. The second instruction above is incomplete by design!
cd efs
sudo nano readme.txt
Create some text in readme. Now login to your other instance; mount efs similarly using the instructions provided by clicking on the Amazon EC2 mount instructions link. Once you create your efs directory, you should be able to see the readme.txt created above.